Hi,
Here is another of my cards that I made for the Kraftyhands launch of the new Cd Rom - 'Man About Town' . Mike and Ian will be showing off this new Cd at 12 noon today and also at 3pm on Create and Craft today.
There will be lots of samples from Mike and Ian and the other Design Team members.
This is from the stepper cardmaking section of the cd. All the components are there ready to be printed off and ready to assemble on to a card to make the stepper. I cut out the stepper panel and mounted this onto a slightly larger piece of purple card. This is optional, the panel could be printed straight onto white card. The purple damask patterned backing paper was matted onto this. There were also two smaller side panels which I have fixed onto the side panels of the stepper.
The image is pyrimaged onto a purple card. I added a sentiment - 'Have a very Happy Birthday' from the set and also fixed four buttons - two to each side of the stepper. Each button was threaded with purple baker's twine for added effect.
I hope you can join the boys on their launch on Create and Craft at 12 and 3pm. See you there.
Happy crafting
Wendy xx
Wednesday, 17 April 2013
Tuesday, 16 April 2013
Man about Town Cd Rom
Hi all,
Just to let you know that Mike and Ian from Kraftyhands will be on Create and Craft tomorrow at 12 and 3pm to launch their new Cd rom 'Man about Town'. As the name suggests it is for the men in your life, because let's face it, they are a difficult bunch to make cards for. Although I must admit, the number of Cds etc in my stash for men's cards is increasing significantly recently, so quickly in fact, I haven't had time to try them all out.
Here is the Cd.
Here is a card that I made using the Cd rom. On the Cd, there are cardmaking sets to make stepper cards and gatefold cards. All the components are there for you to print out and make your card. There are toppers and backing papers etc so that you can make your own style card - in fact, all the things you would expect on a Cd.
This card is a gatefold card, from the gatefold cardmaking section. I love the colours on this one. I matted all the panels onto black card from my stash. I thought that the black would pick out the black on the Dad's trousers on the image.
I used blue baker's twine which I wrapped around one of the panels and also threaded some through the three faux buttons on the inside panel. Here you can write your own message by hand or take it into a programme such as Craft Artist and add your own text.
Here you can write your own message by hand or take it into a programme such as Craft Artist and add your own text.
I hope you will be able to watch the shows and that you will get some inspiration from my teamies. Sadly, I haven't contributed to the samples for the show this time as I was on holiday and didn't have time to make any and get them to the studio in time for the boys to take them to Create and Craft. I am told though, that the samples that they do have are beautiful.
Hope you enjoy the show.
Wendy xx
Saturday, 6 April 2013
Blogger Profile
Hi all,
I have seen a few comment about blogger and the things below. I have copied this from a friend's post and hope it helps. I haven't tried it yet but Donna (Ellis) seems to know what she's talking about!! She's also got some blog candy to give away for April!!
Hope this helps and works.
Wendy xx
I have seen a few comment about blogger and the things below. I have copied this from a friend's post and hope it helps. I haven't tried it yet but Donna (Ellis) seems to know what she's talking about!! She's also got some blog candy to give away for April!!
Many people dislike Google Plus because they have lost their Blogger Profile, making it more difficult for people to locate their blog via the comment name which was established with blogger.
To reestablish blogger, click here to revert back to Blogger Profile:
Some people had to do a few extra steps:
LINK :: https://www.google.com/dashboard [1]
Then Use the link below
This will led you to a page where it will ask to "Change the Blogger Profile Display name" Change the name & Press "Continue To Blogger". The name will be changed. Again go to link [1] & check that your Blogger Profile Name is Changed.
I hope this helps anyone who is unhappy with google plus profile, and wants their Blogger profile back.
Hope this helps and works.
Wendy xx
Kraftyhands April Challenge
Hi Crafty Friends and Followers,
Thank you for popping over to see my blog.
This month's challenge for April over on Kraftyhands has just started and is April Showers (Shades of Blue). Anyone can enter our monthly challenges, the only criteria is that you must be a follower of our challenge blog, we know that taking part is 99.9% of the fun!
To be the monthly winner of the £20 Kraftyhands voucher, you must use at least one Kraftyhands product in the creation of your challenge project.
That's as complicated as it gets!
Each month 4 winners are chosen, the No1 winner will receive a £20 voucher (if they have used a Kraftyhand's product) to spend on the Kraftyhands webshop and the No1 winner's "blinkie", the other three winners will get a winner's "blinkie" for their blogs! So what are you waiting for.
There is lots of inspiration over on the challenge blog, but to give you a taster, here is my DT card using the Vintage Treasures CD from Kraftyhands.
I used the billowing silk backing paper from the Cd and printed this on both sides onto A3 card. Using the Arty Farty template, I cut out the box and aperture and fitted a piece of acetate into the inside of the aperture. I decorated the edges of the aperture using mini daisy braid from my stash.
On the bottom right hand corner, I matted one of the embellishments from the card making section onto blue card from my stash and fixed this onto a blue feather before fixing onto the box. I inserted a hat pin and tied a blue bow and fixed this onto the hatpin. The top of the box is tied with a piece of ribbon from my stash and a tag from the cd was added.
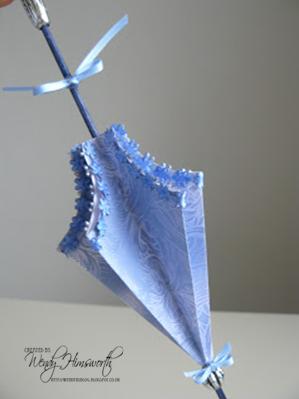
Tha parasol was also made from an Arty Farty template and I cut this out of the billowing silk backing paper. I added mini daisy braid to the edges of the parasol. This was originally white, but I wasn't happy with it so coloured it using one of my Spectrum Noirs, but still wasn't happy with the colour match. Eventually, I found the colour I wanted in a Promarker pen (Cobalt Blue) and coloured the braid in this. I coloured the kebab stick in a dark blue, TB6 I think from the Spectrum Noir range.
I added a silver bead near to the point and a larger siver bead at the 'handle' end. I also added two blue bows, one larger than the other. The smaller was fixed near the small bead at the 'pointy' end, (a technical term) and the larger bow was fixed between the parasol shade and the large bead.
Thank you to my son who helped me model this! (You can see his fingers in the top of the photograph!) Also thank you to you for taking the time to pop over and have a look.
Please come and join us on the challenge, it's a great prize. I should know, I was lucky enough to win it before I joined the Design Team for Kraftyhands. I look forward to seeing your entry.
Good luck!
Wendy xx
Thank you for popping over to see my blog.
This month's challenge for April over on Kraftyhands has just started and is April Showers (Shades of Blue). Anyone can enter our monthly challenges, the only criteria is that you must be a follower of our challenge blog, we know that taking part is 99.9% of the fun!
To be the monthly winner of the £20 Kraftyhands voucher, you must use at least one Kraftyhands product in the creation of your challenge project.
That's as complicated as it gets!
Each month 4 winners are chosen, the No1 winner will receive a £20 voucher (if they have used a Kraftyhand's product) to spend on the Kraftyhands webshop and the No1 winner's "blinkie", the other three winners will get a winner's "blinkie" for their blogs! So what are you waiting for.
There is lots of inspiration over on the challenge blog, but to give you a taster, here is my DT card using the Vintage Treasures CD from Kraftyhands.
I used the billowing silk backing paper from the Cd and printed this on both sides onto A3 card. Using the Arty Farty template, I cut out the box and aperture and fitted a piece of acetate into the inside of the aperture. I decorated the edges of the aperture using mini daisy braid from my stash.
Thank you to my son who helped me model this! (You can see his fingers in the top of the photograph!) Also thank you to you for taking the time to pop over and have a look.
Please come and join us on the challenge, it's a great prize. I should know, I was lucky enough to win it before I joined the Design Team for Kraftyhands. I look forward to seeing your entry.
Good luck!
Wendy xx
Wednesday, 27 March 2013
Iris Stepper Card
Hi there, friends and followers,
Today, I thought I would share with you a card I made using the new 'Kew Floral Collection' Cd from Kraftyhands also known as the 'Floral Stepper Cd Collection'
I used one of the items from the card making section. All the components are there to make a stepper card.
I think this is my favourite image. My favourite colour is blue and I think the background paper is so soft in colour.
The image is decoupaged and matted onto a piece of blue centura pearl cardstock from my stash. On the base of the card, I have decoupaged two irises and placed one at each side of the sentiment which reads 'Happy Birthday'.
Thank you for taking the time to pop over and have a look.
Wendy xx
Tuesday, 26 March 2013
Easter card and basket
Hi friends and followers,
Today I thought I would share with you an Easter card and basket that I made using the Sunshine and Smiles Cd from Kraftyhands.
I like this Cd, I think it has some cute characters on it and they can be found in a number of different colours, all beautiful. The design I chose for my card is a little girl with a daisy face and is standing in half of an egg, that's why I chose it.
(My DT card for the March Kraftyhands challenge was this design but in a different colour). I decoupaged the image and added a bow to the egg to match the bow in her hair. I matted the topper onto a dark green card that I had in my stash and mounted it onto a 6x6 card blank. I used card candy for the corners, but as I did not have the colour I needed for the card, I coloured 4 of them in CG2 from my Spectrum Noir pens. There are lots of sentiments on the design sheet that you print out, but I took one of these into Craft Artist and changed the wording to 'Happy Easter'.
Inside, I fixed an insert which coordinates with the front of the card.
For the basket, I printed out the same backing paper that is on the front of the card onto an A4 piece of card. On the reverse, I printed a yellow gingham backing paper which also matches the centre of the topper on the card. To cover the joins on the basket, I cut a circle from the Standard Circles Large Dies in the yellow gingham backing paper, and a smaller one using the same dies in the green hexagonal patchwork paper and then fixed the daisy face in the centre of these.
I used a Martha Stewart punch to decorate the handle (arches, I think) and fixed a ribbon from the Cd to the centre of the handle. This reads - 'Sunshine and Smiles'. I filled the basket with yellow tissue paper and then added some chocolates. My first choice was Cadbury Creme eggs but they didn't match the basket, so I changed them to these Ferrero Rocher chocolates - none of which I can eat because I am allergic to them. I'm sure my husband or son will manage to eat them though!
I would like to enter this project into the following challenges:
Hobbycutz - Easter/Easter Box (2W, S, 54) (TBA Sun 7th April)
Make It Monday - Anything Goes (W, M, ,84) x
Challenges 4 Everybody - Anything Goes (2W, S, 346) x
Cutie Pie Challenge - Easter (2W, M, 140) x
Eclectic Ellapu - Whimsy and/or funny (W, S, 11) x
I hope you all have a lovely Easter. Take care and don't eat too much!
Wendy xx
Friday, 22 March 2013
Happy 21st James
Hi friends and followers,
I thought I would share with you a card I made for one of my son's friends who turned 21 today. He is into bikes and has a Yamaha R6 which this one is, (it said so on the label!!). Well I say he is into bikes. Yesterday, the day before his 21st, he went for a ride on his bike and had a blowout and came off the bike and dislocated his shoulder!! I had already made the card, so I'm afraid, this is what he got for his birthday, my son still wanted to send it to him.
I used 'The Big One' Cd Rom, by La Pashe, for the decoupaged image and took one of the backing papers from 'The Best of Justinklined' in to Craft Artist and made it larger, to fit the card I was going to use. I also made the tiles in Craft Artist with the letters and numbers and the word 'Congratulations' so that it would match the rest of the card, using a light blue colour from the bike image.
I made a stepper card from a template that I made, the opposite opening to yesterday's stepper. The topper is one of the 'Pile Up' toppers and is a pyrimage effect. I matted the dark blue gingham backing paper onto black card and then fixed this onto the card. I did this on the main central part, on the two side panels and on the bottom panel. I cut out the letter and number tiles and matted these onto black card (what a pain, but worth it, I think!). As you can see, I spelt the word 'James' down one side panel, 'Today' down the other and put '21' along the top. I placed the word 'Congratulations' along the bottom panel. Again, I wasn't sure whether I had gone over the top with the lettering, but my son thought it was great, so that was good enough for me.
I hope James has a good birthday and that his shoulder is better soon. My son has just gone to pick him up to take him to college because he can't drive or ride his bike at the moment!
Thank you for popping by and thank you in advance for your comments, I really do appreciate them.
Happy crafting.
Wendy xx
Subscribe to:
Posts (Atom)