Monday, 11 February 2013

Vintage shaped card

Hi Crafters,
Sorry I haven't been around lately, but my uncle is still ill and I've been visiting him. It's a 130 mile round trip so takes up a lot of time travelling.

Anyway, I thought I would show another of my DT cards for Kraftyhands. I have used the Vintage Treasures CD rom again. This will be launched on Tuesday 19th February on Create and Craft by Mike and Ian. The shows go out live at 1pm and 6pm - not to be missed.


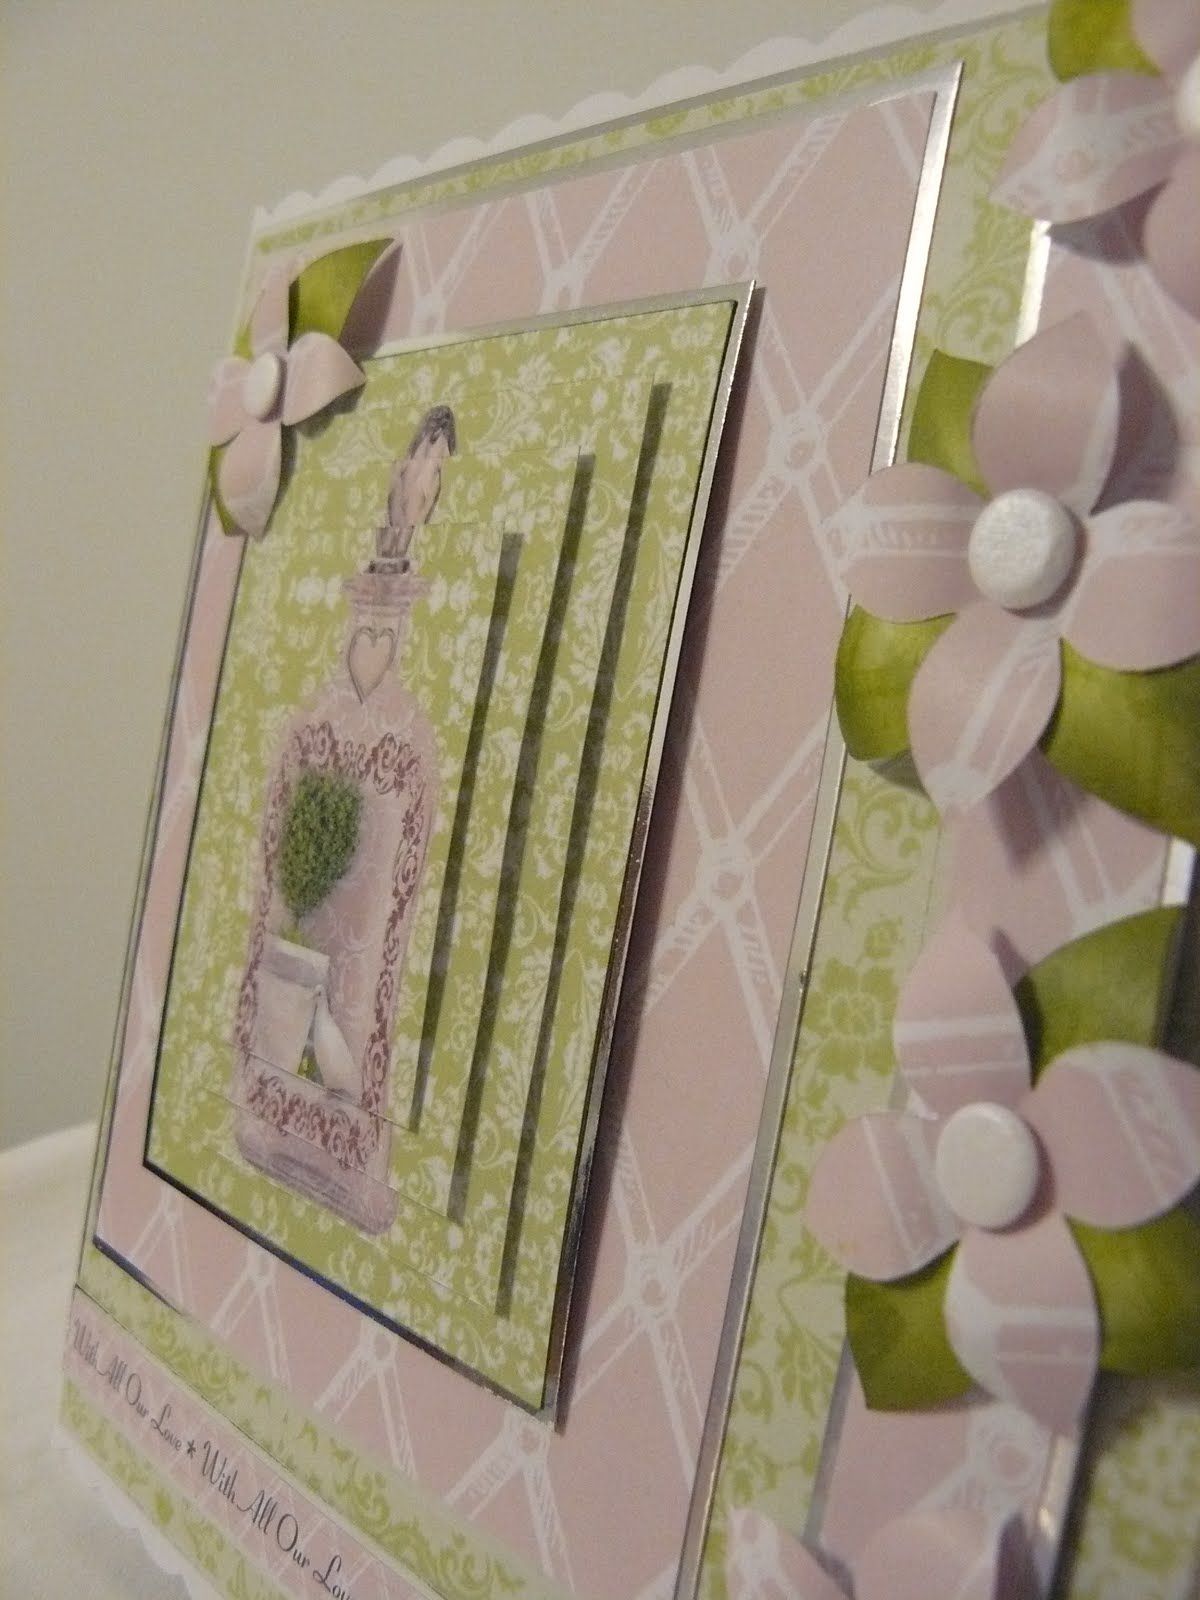
For my card, I used a shape from the Cricut Lacy Labels cartridge and made an easel card after printing one of the backing sheets on to the card before cutting it.


I used one of the mats from the cardmaking section on the cd and matted this onto silver mirri, and one of the toppers which I decoupaged onto the mat. I also decoupaged the faux hat pin and glazed it with Pinflair glaze but it doesn't show up very well in this photograph. This is something that I have had in my stash for ages but never used!

 
In the opposite corner to the hatpin, I placed a bouquet of cream roses. In the packet, they were quite tight budded, so I teased them out with my tweezers so that they looked a little fuller in bloom. I tied a bow with some dark green ribbon, to compliment the one on the hatpin. Added this to the bouquet, to cover the stems and added a gem.


For the stopper for the easel, I made a rosette from a coordinated backing paper by concertinaing it after scoring it on the Hougie Board. I made this into an ellipse shape rather than circular so that it was in keeping with the shape of the topper (although you can't tell on this photgraph.) I placed one of the sentiments from the set onto the rosette and placed two pearl rings on the base, one either side of the rosette and sentiment.

 
On the inside of the easel, I matted an insert onto silver mirri and placed this onto the base of the easel. The image on the topper and insert could mean that this card could be for a wedding, anniversary or a birthday.
 
 
I would like to enter this card for the following challenges:-

Pile it on - Shaped Cards - http://pileitonchallenge.blogspot.co.uk/
The Squirrel and the Fox - No. 37 - Love - http://thesquirrelandthefox.blogspot.co.uk/
Crafty Calendar Challenge - Love and Marriage - http://craftycalendarchallenge.blogspot.co.uk/
Speedy and Friends - Love - http://marksfinestpapers.blogspot.co.uk/ *WINNER*
Make it Monday - Anything Goes - http://ppp-makeitmonday.blogspot.co.uk/
Daring Cardmakers - Love is in the Air - http://daringcardmakers.blogspot.co.uk/
Challenges 4 everybody - No. 13 - Anything Goes - http://challenges4everybody.blogspot.co.uk/
Pretty Little Ribbon Shop - Anything Goes - http://theprettylittleribbonshop.blogspot.co.uk/

Thank you for popping by. Please feel free to leave a comment and/or become a follower. The more the merrier. Thank you.

Happy crafting

Wendy
xx

Tuesday, 5 February 2013

Fan card from new Vintage Treasures Cd

Hi crafters,

Here is one of my DT samples for the new Vintage Treasures CD which is to be launched by Mike and Ian of Kraftyhands on Tuesday 19th February at 1pm and 6pm on Create and Craft.

 
It's an A5 white card that I have distressed on the edges with TimHoltz's Distress ink - Tea Dye. I used one of the backing papers from the Cd and backed this onto a brown mat from the Cd. This comes in a 5x5 size on the Cd and I wanted it to fit my A5 card so I took it into Craft Artist and made it larger.

 
The topper has been matted onto the brown mat from the Cd and the centre topper has been matted onto the centre of a doily which has been distressed using Tim Holtz's Broken China Distress Ink and attached these with 3D foam pads to raise them up.

 
I embellished the top left hand corner with a white rose which I distressed with the Broken China and attached a small string of pearls before attaching to the card with Pinflair.

 
To the bottom right hand corner, I attached a fan which I made from a left over piece of the backing paper and concertinaed it using the Hougie Board. I distressed this with Tea Dye and attached a turquise tassle to make it into a fan shape. I also attached a 'Happy Birthday' sentiment also from the Cd.
 
Inside, I used one of the portrait inserts and added text by taking it into Craft Artist and using a font colour to match the image in the bottom right  of the insert.
 
Here is the cover of the CD Rom. As I said to Mike, Ian and Linda, this is not a style I would normally go for and probably wouldn't have bought the Cd, but having seen the images and having used it, I thoroughly enjoyed it and glad I was given the opportunity.
 
I would like to enter this card into the following challenges:-
 
Crafty Card Makers - Vintage Love - http://craftycardmakers.blogspot.co.uk/ - *TOP 5*
Creative Creations Challenge - It must be love - http://www.creativecreationschallenges.blogspot.co.uk/
Incy Wincy Designs - Love is in the Air - http://incywincydesigns.blogspot.co.uk/
Make it Monday - Anything Goes - http://ppp-makeitmonday.blogspot.co.uk/
Unstampabelles - Use a doily - http://unstampabelleschallenges.blogspot.co.uk/ (Hope this counts) 
 
Happy crafting.
Wendy x


Monday, 4 February 2013

Wellington 21st Card

Hi,

It's just a quick post tonight people. It's been a funny old day. I had a message at 8.30am to say my uncle had been taken into hospital. Unfortunately, they say they can't do anything else for him and they have sent him back to the Nursing Home with antibiotics. The antibiotics may work but they may not. He's comforatable. He's been in and out of hospital for the last fortnight and been given quite a few lots of antibiotics so fingers crossed.

Then this afternoon, I took the dog out for a walk and fell down a hole would you believe. I got up and was a bit sore, but I'm starting to ache all over now, so I'm going to post this and then go to bed, I think.

Today, I thought I would share with you a 21st card I made using Wellington Past times CD Rom by Docraft.

 
Recipe
 
White A4 card to make Easel card
Black card for mat
Wellington Past times Cd for image and backing paper
I used the alphabet from the Cd to put the words 'Congratulations' and '21 Today' onto the blue backing paper
 

I would like to enter this card into the following challenges:-

Crafty Bloggers Network - Anything Goes - http://www.craftybloggersnetwork.blogspot.co.uk/
Make It Monday - No 126 - Anything Goes - http://ppp-makeitmonday.blogspot.co.uk/
Love to Create - Celebrate - http://lovetocreatechallenge.blogspot.co.uk/
Pretty Little Ribbon - Anything Goes - http://theprettylittleribbonshop.blogspot.co.uk/
Crazy Challenge - For a Birthday - http://crazychallenge.blogspot.co.uk/


Take care everyone.

Wendy xx

Saturday, 2 February 2013

Kraftyhands Monthly Challenge

Hi there,

This month's challenge (February) over on Kraftyhands has just started and is Spring Colours. Anyone can enter our monthly challenges, the only criteria is that you must be a follower of our challenge blog, we know that taking part is 99.9% of the fun!

To be the monthly winner of the £20 Kraftyhands voucher, you must use at least one Kraftyhands or Crafter's Companion product in the creation of your challenge project.

That's as complicated as it gets!

Each month 3 winners are chosen, the No1 winner will receive a £20 voucher to spend on the Kraftyhands webshop and the No1 winner's "blinkie", the other two winners will get a winner's "blinkie" for their blogs! So what are you waiting for.

There is lots of inspiration over on the blog, but to give you a taster, here is my DT card using the Chic Boutique CD from Kraftyhands.


My base card was a white 8x8 scalloped card. I used a topper from the Pyramid Toppers section and matted and layered this on to silver mirri, which was in turn put onto a pink backing
 paper from the lattice backing papers and again matted and layered onto silver mirri. I also matted and layered a narrower piece of this paper onto silver mirri which acted as lattice work for my flowers to be fixed to. These were then fixed onto a green backing paper from the floral backing papers and matted and layered onto silver mirri and then fixed to the base card using Collall glue. 


The flowers were cut from the pink lattice backing paper using the Cuttlebug Flowers dies, the leaves were cut on the Cricut using the Plantin Schoolbook cartridge from a green backing paper from the CD and distressed with Tim Holtz's Distress Ink in Peeled Paint. They were attached to the lattice paper using Pinflair gel. The centres of the flowers are Kard Kandi - Parma Violets (white ones).


 The strip across the bottom of the card is from the Decorative Ribbons section and matted and layered onto silver mirri in keeping with the rest of the card.

Please feel free to pop over to the Kraftyhands blog and look at the inspiration from my Design Team mates.

We look forward to seeing your entry.

Happy krafting

Wendy xx

Wednesday, 30 January 2013

Lady in purple

Hi everyone,
 
Today I thought I would share with you one of my DT cards for Cupcakecrafting. Again it's from 'A Touch of Elegance'.
 

It is an 8x8 card and I chose a purple topper and backing paper from the Cd. The backing paper is matted onto black card and then fixed to the card. The topper is pyrimaged and matted onto black card.


On the sheet of toppers, there is a tag so I used this in the top left hand corner. I matted this onto black card and added a purple bow. I also used a square Epiphany button and fixed this to the tag.


 Inside of the button is a small picture of the lady in purple. On the bottom right hand corner I added some flowers which are also from the Cd.

 
I would like to enter this card into the following challenges:-
 
Through The Craft Room Door - Always Anything Goes - http://www.craftdoormagazine.com/
Party Time Tuesdays - Anything Goes - http://partytimetuesdays.blogspot.co.uk/
The pretty Little Ribbon Shop - Ribbons and flowers - http://theprettylittleribbonshop.blogspot.co.uk/
 
 Thank you for stopping by. I do appreciate it and enjoy reading your comments.
 
Wendy xx


Monday, 28 January 2013

Octagonal aperture

Hi there,

Well it's 1.15am and I'm still in my craft room.

Last night when my son came in from the gym, he said he could smell gas at the bottom of the drive. We rang British Gas and they sent someone out who bored holes in my garden and up the drive. He said that the leak was at the bottom of the drive and someone would come out early in the week.

This morning when my hubby took the dog for a walk, he could smell gas further up the street, next door but one to be exact, so we rang British Gas again. Someone else came out and he said the leak was across the road and someone would be out within the hour to investigate further. So at 3.30pm this afternoon, two men in a van came and started digging on the pavement across the road. It is now 1.25am and they are still at it. I bet the neighbours just love us!! There's a generator making a noise and they are drilling, so I can't see the point in going to bed as we sleep in the front room.

So I thought I would share with you a DT card I made using 'A Touch of Elegance' from Cupcakecrafting. This was an idea I had, but as usual, when I made my idea into a card, it wasn't as good as I expected, but I'm going to show it anyway. I have seen them done in a sort of square before but felt that this image lent itself to an octagon shape.


I used an 8x8 card blank as my base card. I printed off a backing paper onto another piece of A4 card and printed a coordinating paper on the reverse. I drew round the largest topper to make a template and then drew around this onto my card. I found the centre point and then cut diagonally from opposite corners through the centre point (if that makes sense) and then curled each section back - 8 in total. In order to hold these pieces down, I used coordinating brads as I felt they may spring off if I used 3d foam pads as I have seen used before.


The topper was a pyrimage, so I layered this up and then positioned it on my card and within the aperture on the backing paper after placing a coordinating mat on the base card. I fixed the topper to the copper coloured card mat and then fixed the backing paper with aperture over this. In the bottom right hand corner, I fixed some flowers which are also on the cd and placed a gem in the centre of each to add interest. In the top left hand corner, I put a sentiment which I made on the computer using the sentiment boxes on the Cd and took this into Craft Artist to  print it onto a similar backing paper which I had made paler.

 
To finish the card off, I added an insert in the middle which also came from the Cd and are text editable. This was done in a similar way to the sentiment, by taking it into Craft Artist and printing onto a paler backing paper to make it more interesting than just a plain white insert. 
 
 
Thank you for popping over. Everything has gone quiet now over the road, so I may just go up to bed and see if I can get some sleep.
 
I would like to enter this card into the following challenges:-
Scrappy Frogs - Try something new - (new thing is octagonal aperture) -  http://scrappyfrogschallenge.blogspot.co.uk/
Totally Gorjuss - No. 168 - Flowers - http://totallygorjuss.blogspot.co.uk
Make it Monday - No. 125 - Anything Goes - http://ppp-makeitmonday.blogspot.co.uk/
 Craft Bloggers Network - Flowers - http://craftybloggersnetwork.blogspot.co.uk/
 
Happy crafting.
 
Wendy xx

Sunday, 27 January 2013

Miranda and Mo in the garden

Hi crafters,
I hope you're having a good weekend.
 
Today, I thought I would show you the card I made yesterday which I didn't photograph until today as I thought it would be too dark. I apologise for the photographs today, they were taken in daylight and looked great on the camera screen but look dark on here!!
 
 
For this card I used Miranda and Mo Cd from Kraftyhands. Its the first time I've used it and there are lots of lovely toppers and backgrounds etc on there. I thought as it was the first card I have published for Kraftyhands, I would use a sketch as I seem to be getting in a rut with my layouts. So I chose one from a site on Feline Playful. However, the card I used was a 6x6 and for the items I wanted to use, they wouldn't fit the sketch so I changed it a little, but it doesn't matter because I wasn't going to enter it into that particular challenge anyway!!
 
I matted a blue polka dot backing paper onto silver mirri and placed this on my card blank. I intended to decoupage the topper and cut it out and stuck it together with Pinflair. However, what I didn't realise was that the two toppers on the sheet that I printed out weren't meant to go together AND then fix the decoupage on. The decoupage was meant to fit on the larger topper!! Mmm - I'll know next time. It's all a learning curve!
 
So mark 2 - I fixed the smaller topper onto the larger topper using 3d foam pads. This was matted onto silver mirri. Using my Cricut machine and the Plantin Schoolbook cartridge, I cut a circle in the dotty flower backing paper and a slightly larger one in silver mirri. There is a decorative band on the sheet which I cut out and before I matted this onto silver mirri, I cut out the wings on some of the butterflies so that they stood proud of the band. There is also faux stitching on the top and bottom of the band.


I then fixed this to the card using 3d foam pads, and then fixed the topper over the circle and then onto the backing paper. I used a 'Happy Birthday' sentiment from the set, matted this onto silver mirri and cut this out free hand. In thetop right hand corner, I placed 3 blue Kard Kandy buttons.
 
 
Inside, I added an insert to finish it off. 
 
 
I would like to enter this card into the following challenges:-
LEJ Designs - stitching real or faux - http://lejdesignschallengeblog.blogspot.co.uk/ (Faux stitching is on top and bottom of band)
Try it on Tuesday - Lets get stitchy real or faux - http://tuesdaytaggers.blogspot.co.uk/ (Faux stitching is on top and bottom of band)
My Craft Creatoins - Flowers and butterflies - http://craftcreatoins.blogspot.co.uk/

Thank you for calling by and enjoy the rest of your weekend.

Wendy xx